Building a home made Sonos
Wow, it's hard to believe it's been pretty much two years since I posted a blog entry, Facebook removed my need to blog, and I now stay in touch with family and friends that way. So onto they blog entry, why post something now? Well those of you that are friends with me on Facebook, know that I purchased a partially built house last year, which for the last few months has been getting finished. As the house was just a skeleton, it gave me an opportunity to do useful things like put CAT6 throughout the house, with various network sockets scattered around the house. It also gave me the opportunity to do something else I've wanted to do and that was to put music into every room.
I had a few requirements for my system which were:
1. No visible power supplies.
2. No visible wires.
3. Ability to sync rooms, so they play the same music, or play different music independently.
4. Support for AirPlay, so guests can stream music if they are staying in the guest room for example.
5. Power of the CAT6 through Power-Over-Ethernet (PoE), so regular electrical sockets wouldn't need to be hidden in the walls or ceiling
6. Ability for the system to play music without requiring the controller to be turned on, example iPhone or iPad, so the controller is not streaming the music.
I have many friends that love and swear by their Sonos devices, so I gave them a good hard look, I liked the Sonos, but Sonos didn't cover all my requirements, like no visible wires or power supplies, I looked at other solutions too, but nothing really met my requirements, often with the PoE being the biggest stumbling block.
I had no issue making my own solution, as long as I could make it easily, relatively cheaply and ensure it was reliable. From my experience with the children's cockpit, I started to think about the Raspberry Pi and if any solutions could be built using that. So I started with simple google searches for things like PoE for Raspberry Pi, Raspberry Pi Sonos, homemade Sonos and reading up the different links, I found myself building my own system based around the Raspberry Pi with off the shelf components and software
Here's what I ended up with, hidden in the ceiling or wall of each room.
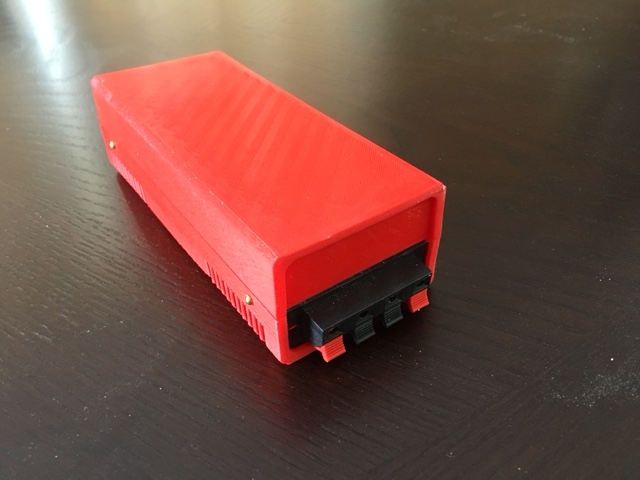
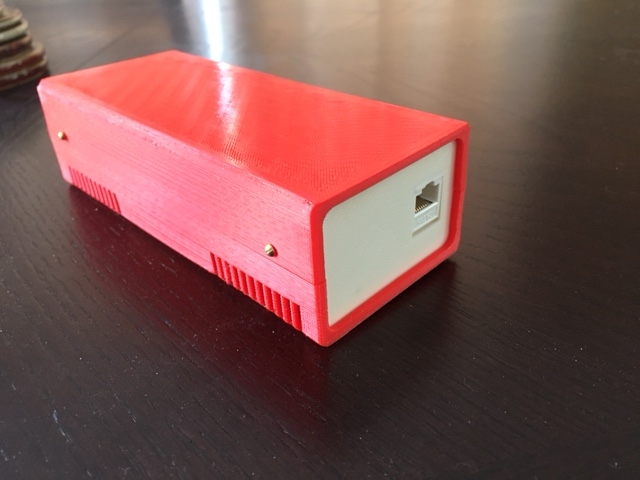
The insides consist of:
1 x Raspberry Pi 3 - $38.27
1 x Pi PoE Switch HAT - $40.44
1 x HiFiBerry Mini Amp - $22.90
1 x Stacking Header for Rasperry Pi - $12.99 (for 5)
1 x 8Gb Micro SD Card - $6.45
1 x On-Q/Legrand Set Of 2 100-Watt 6.5-in Round In-Ceiling Speaker - $71.95
I designed and printed my own case, and used a couple of parts to tidy up the end for speaker connectors and network connectors, not needed, but added about $8 to the overall cost of each player.
To power them all I purchased a 8 Port PoE Switch - $114.99
So the cost for all the hardware averaged out over 7 devices came to right around $200. Obviously if your requirements are different and you don't need PoE, or in ceiling speakers this cost comes down quite a bit.
With this setup each device could meet my requirements, and as I built it, even give me a few extra benefits.
The nice thing with this setup, is it's all plug and play, there is NO soldering needed (unless you decide to include the speaker connectors), so it's a great project if you wanted to make one with a child that might be interested in electronics, and you want them to see results quickly.
The build was basically as follows:
1. Take the PoE Switch HAT and connect it to the Raspberry Pi. On the PoE Switch, there is a power switch to turn the Pi On and Off. As this is going to be hidden in a case, and then hidden in the ceiling, I wanted it to always power on when there is power coming from the ethernet cable, and if I really have to do a hard reboot, I would just disconnect it at the router. To achieve this remove the jumper that is on the Switch HAT.
2. Plug the Stacking header onto the pins on the Switch HAT, this is needed, otherwise the HiFiBerry MiniAmp when plugged into the GPIO pins on the Switch HAT would short out on the ethernet cable casing, this stacking header separates the HiFiBerry board from the Switch HAT.
3. Plug the HiFiBerry MiniAmp onto the Stacking header. This mini amp is totally powered by the onboard Rasperry Pi power, so no external power is required. Whilst this Amp is only 3 Watts, it sounds great on the On-Q speakers and is plenty loud enough, especially when you have multiple rooms synced together. Why go with an Amp at all, well we need an Amp to power the speakers, but also the inbuilt audio on the Raspberry Pi tends to pick up lots of electrical interference, so for example, if you plugged in powered speakers in to the Raspberry headphone jack, you'd hear lots of hiss and crackle, with the HiFiBerry MiniAmp, I don't get any of the hiss or crackle, and it also powers the speakers.
4. Connect the HiFiBerry speaker out to the speakers.
So now we have the physical hardware prepared but what about the software, the stuff that does the rest of the work? Well it turns out there are lots of options out there, from doing the entire thing yourself from scratch putting lots of different software components yourself or you can go the easy way and get a prebuilt image where all the work has been done for you. I found a few solutions such as Volum.io, RuneAudio and Max2Play.
I went with Max2Play because of it's ease of use for setup, and some of the plug-ins that are available, for example the WiFi Access Point plugin, that lets each Device act like a WiFi hotspot, yep a hotspot in every room.
The key to making all this work, is something Logitech built a few years ago, the Squeezebox Server, even though Logitech have pretty much abandoned Squeezebox, the open source community has taken it on and continues to enhance it, and plenty of extensions are still being made for the Squeezebox server, such as BBC and Spotify.
The Max2Play software, will automatically setup and configure the squeezebox server, so immediately after setup you can stream from thousands of radio stations around the world.
The key thing you want to do is only have one of the devices acting as the Squeezbox server, with the others as players. Otherwise you will run into issues trying to sync the audio on the players, and not all players appearing.
For controlling the players, you can use the free Squeezbox app that is still available as an app, but I prefer the iPeng 9 player, which has much better control and customization than the much older squeezebox app.


