
Setting up a UK Wireless network in the US
Category None
This entry is as much for my own records as the usual public service. As many of you know I like to get my BBC and other shows whilst still living in the US. I do this using a VPN service, in my case Witopia.net, Witopia works great, but whenever I want to connect to it on a PC or on the iPad etc. I have to connect to the VPN, and if fellow Brits are visiting and they need to appear like they're in the UK, then they'd need to setup the VPN connection on their device. For the PS/3 as I blogged previously, I have to go through a Proxy server. Which works great, but doesn't work for ITVPlayer. So what's the solution? The solution is connecting a second router to the VPN service. So I'm storing these instructions should I ever have to do it again...
1. Buy a router that can support DD-WRT big installation, which includes OpenVPN client capabilities. In my case I purchased a refurbed Cisco/Linksys E2000 from Microcenter for $50.
2. Install dd-wrt on the router, this is the most complicated bit, but is easier on some other routers. Here are the Linksys E2000 instructions I followed http://dd-wrt.com/wiki/index.php/Linksys_E2000#Flashing_instructions_for_the_E2000
3. Now signup for a VPN service like Witopia.net For Witopia, you'll need to purchase at a minimum the personalVPN™ SSL (openVPN) only option. I personally go for the PersonalVPN Pro option, as then when I'm travelling I can still use the VPN on my PC, iPad, iPhone etc. Sometimes it's useful to appear like you're in the US as opposed to the UK, example trying to watch Netflix from UK.
4. When you register with Witopia, they will send you a link that contains their windows installer, you can ingnore the windows installer (unless you want to use it), instead look for the line on the page "If you don't have an operating system we support with our installers, or desire to download the components by hand and put them in place yourself, go here." Click this link.
5. Download from the Witopia Page, the New Certificate, your New Key and the Personal VPN ca.crt (you might need to use right mouse button, to save link as), keep them safe and remember where you downloaded them to.
6. Connect your new router to your existing router, connect the existing router to the new router via the Internet port on the new router.
7. Connect an ethernet cable from your PC to the new router
8. Login to the admin panel, typically 192.168.1.1, sign in. Go to the Setup, Basic Setup Tab, in the Network Setup section, under Router IP, change the Local IP Address to one that is different to your existing router, example 192.168.2.1
9. Scroll down to the Network Address Server Settings (DHCP Section), enter DNS servers, I just use google, 8.8.8.8 and 8.8.4.4
10. Scroll down to Time Settings, Enable the option, select your timezone and enter an IP address for an internet NTP server. Use IP incase there are any problems with DNS.
11. Click, Save and then Apply Settings.
12. OK now gets a little trickier, but really isn't that hard. Log back into the router, but using the new IP address entered in step 8, 192.168.2.1
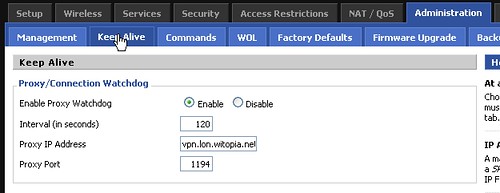
13. Switch to the tab Administration, Keep Alive, and set the following options, where Proxy IP Address is the witopia server you are connecting to
14. Click Save, Apply Settings.
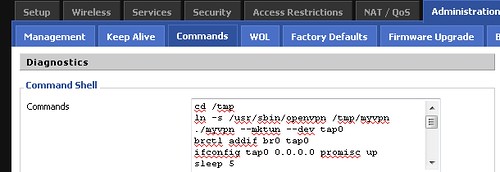
15. Click on Administration, Commands Tab.
16. Now we're going to need to create a startup script for the router, I found the easiest way to do this is with a text editor like Notepad, don't do it in Word or any other fancy word processor as they tend to add extra stuff or change quotes when you cut and paste. In your notepad editor paste the following text :
###########################################
cd /tmp
ln -s /usr/sbin/openvpn /tmp/myvpn
./myvpn --mktun --dev tap0
brctl addif br0 tap0
ifconfig tap0 0.0.0.0 promisc up
sleep 5
echo "
client
daemon
dev tun
proto udp
remote vpn.lon.witopia.net 1194
resolv-retry infinite
nobind
persist-key
persist-tun
ca ca.crt
cert client.crt
key client.key
ns-cert-type server
cipher bf-cbc
comp-lzo
verb 3
mute 20
mssfix 1450
" > /tmp/client.conf
echo "
-----BEGIN CERTIFICATE-----
INSERT CA.CRT HERE
-----END CERTIFICATE-----
" > /tmp/ca.crt
echo "
-----BEGIN RSA PRIVATE KEY-----
INSERT YOUR NAME.KEY HERE
-----END RSA PRIVATE KEY-----
" > /tmp/client.key
chmod 600 /tmp/client.key
echo "
-----BEGIN CERTIFICATE-----
INSERT YOUR NAME.CRT HERE
-----END CERTIFICATE-----
" > /tmp/client.crt
./myvpn --config client.conf --float
route add -net 192.168.2.1/24 dev br0
###########################################
Now we need to be careful as we need to edit the text and modify a few details.
1st Locate the line "remote vpn.lon.witopia.net 1194" and change the server name to the Witopia server gateway you wish to connect to, in this case vpn.lon.witopia.net
2nd Open up the ca.crt file you downloaded from witopia with another instance of notepad. copy the contents of it and replace the lines -----BEGIN CERTIFICATE-----,INSERT CA.CRT HERE,-----END CERTIFICATE----- with it's contents
3rd Open up your .key file provided by witopia, and replace the lines -----BEGIN RSA PRIVATE KEY-----, INSERT YOUR NAME.KEY HERE, -----END RSA PRIVATE KEY----- with it's contents
4th Open up your remaining CRT file provided by witopia, and replace the lines -----BEGIN CERTIFICATE-----, INSERT YOUR NAME.CRT HERE, -----END CERTIFICATE----- with it's contents
5th Locate the last line "route add -net 192.168.2.1/24 dev br0" and change the IP address to the IP Address you assigned to the router in step 8
17 Paste the new text file contents into the Command window and click Save Startup.
18. Now in the Commands window, paste the following Line and click Save Firewall
iptables -A POSTROUTING -t nat -o tun0 -j MASQUERADE
19. Click on the tab Administration, Management and scroll down and click on Reboot Router.
20. Now give your router a couple of minutes to reboot and to connect to the VPN. Then fire up a browser and try a website like www.whatismyip.com to see if your IP address is being shown as the correct location. If it is, just use the hubs wireless network connection to appear as if you're in the UK, or whatever country the VPN resides in.
That's it, now people who visit can connect to my TylerUK wireless network and they'll appear as if they're in the UK, if they connect to my TylerGuest network then they appear like they're in the US. Done.
This entry is as much for my own records as the usual public service. As many of you know I like to get my BBC and other shows whilst still living in the US. I do this using a VPN service, in my case Witopia.net, Witopia works great, but whenever I want to connect to it on a PC or on the iPad etc. I have to connect to the VPN, and if fellow Brits are visiting and they need to appear like they're in the UK, then they'd need to setup the VPN connection on their device. For the PS/3 as I blogged previously, I have to go through a Proxy server. Which works great, but doesn't work for ITVPlayer. So what's the solution? The solution is connecting a second router to the VPN service. So I'm storing these instructions should I ever have to do it again...
1. Buy a router that can support DD-WRT big installation, which includes OpenVPN client capabilities. In my case I purchased a refurbed Cisco/Linksys E2000 from Microcenter for $50.
2. Install dd-wrt on the router, this is the most complicated bit, but is easier on some other routers. Here are the Linksys E2000 instructions I followed http://dd-wrt.com/wiki/index.php/Linksys_E2000#Flashing_instructions_for_the_E2000
3. Now signup for a VPN service like Witopia.net For Witopia, you'll need to purchase at a minimum the personalVPN™ SSL (openVPN) only option. I personally go for the PersonalVPN Pro option, as then when I'm travelling I can still use the VPN on my PC, iPad, iPhone etc. Sometimes it's useful to appear like you're in the US as opposed to the UK, example trying to watch Netflix from UK.
4. When you register with Witopia, they will send you a link that contains their windows installer, you can ingnore the windows installer (unless you want to use it), instead look for the line on the page "If you don't have an operating system we support with our installers, or desire to download the components by hand and put them in place yourself, go here." Click this link.
5. Download from the Witopia Page, the New Certificate, your New Key and the Personal VPN ca.crt (you might need to use right mouse button, to save link as), keep them safe and remember where you downloaded them to.
6. Connect your new router to your existing router, connect the existing router to the new router via the Internet port on the new router.
7. Connect an ethernet cable from your PC to the new router
8. Login to the admin panel, typically 192.168.1.1, sign in. Go to the Setup, Basic Setup Tab, in the Network Setup section, under Router IP, change the Local IP Address to one that is different to your existing router, example 192.168.2.1
9. Scroll down to the Network Address Server Settings (DHCP Section), enter DNS servers, I just use google, 8.8.8.8 and 8.8.4.4
10. Scroll down to Time Settings, Enable the option, select your timezone and enter an IP address for an internet NTP server. Use IP incase there are any problems with DNS.
11. Click, Save and then Apply Settings.
12. OK now gets a little trickier, but really isn't that hard. Log back into the router, but using the new IP address entered in step 8, 192.168.2.1
13. Switch to the tab Administration, Keep Alive, and set the following options, where Proxy IP Address is the witopia server you are connecting to
14. Click Save, Apply Settings.
15. Click on Administration, Commands Tab.
16. Now we're going to need to create a startup script for the router, I found the easiest way to do this is with a text editor like Notepad, don't do it in Word or any other fancy word processor as they tend to add extra stuff or change quotes when you cut and paste. In your notepad editor paste the following text :
###########################################
cd /tmp
ln -s /usr/sbin/openvpn /tmp/myvpn
./myvpn --mktun --dev tap0
brctl addif br0 tap0
ifconfig tap0 0.0.0.0 promisc up
sleep 5
echo "
client
daemon
dev tun
proto udp
remote vpn.lon.witopia.net 1194
resolv-retry infinite
nobind
persist-key
persist-tun
ca ca.crt
cert client.crt
key client.key
ns-cert-type server
cipher bf-cbc
comp-lzo
verb 3
mute 20
mssfix 1450
" > /tmp/client.conf
echo "
-----BEGIN CERTIFICATE-----
INSERT CA.CRT HERE
-----END CERTIFICATE-----
" > /tmp/ca.crt
echo "
-----BEGIN RSA PRIVATE KEY-----
INSERT YOUR NAME.KEY HERE
-----END RSA PRIVATE KEY-----
" > /tmp/client.key
chmod 600 /tmp/client.key
echo "
-----BEGIN CERTIFICATE-----
INSERT YOUR NAME.CRT HERE
-----END CERTIFICATE-----
" > /tmp/client.crt
./myvpn --config client.conf --float
route add -net 192.168.2.1/24 dev br0
###########################################
Now we need to be careful as we need to edit the text and modify a few details.
1st Locate the line "remote vpn.lon.witopia.net 1194" and change the server name to the Witopia server gateway you wish to connect to, in this case vpn.lon.witopia.net
2nd Open up the ca.crt file you downloaded from witopia with another instance of notepad. copy the contents of it and replace the lines -----BEGIN CERTIFICATE-----,INSERT CA.CRT HERE,-----END CERTIFICATE----- with it's contents
3rd Open up your .key file provided by witopia, and replace the lines -----BEGIN RSA PRIVATE KEY-----, INSERT YOUR NAME.KEY HERE, -----END RSA PRIVATE KEY----- with it's contents
4th Open up your remaining CRT file provided by witopia, and replace the lines -----BEGIN CERTIFICATE-----, INSERT YOUR NAME.CRT HERE, -----END CERTIFICATE----- with it's contents
5th Locate the last line "route add -net 192.168.2.1/24 dev br0" and change the IP address to the IP Address you assigned to the router in step 8
17 Paste the new text file contents into the Command window and click Save Startup.
18. Now in the Commands window, paste the following Line and click Save Firewall
iptables -A POSTROUTING -t nat -o tun0 -j MASQUERADE
19. Click on the tab Administration, Management and scroll down and click on Reboot Router.
20. Now give your router a couple of minutes to reboot and to connect to the VPN. Then fire up a browser and try a website like www.whatismyip.com to see if your IP address is being shown as the correct location. If it is, just use the hubs wireless network connection to appear as if you're in the UK, or whatever country the VPN resides in.
That's it, now people who visit can connect to my TylerUK wireless network and they'll appear as if they're in the UK, if they connect to my TylerGuest network then they appear like they're in the US. Done.
| Permalink | ![]()
![]()
![]()
Comments
Now to figure how to do that on an Airport Extreme....
Angus
Posted by Angus Fox At 04:53:09 AM On 09/23/2011 | - Website - |
Looking through your instruction its not clear to me how you parse the username and password for the VPN connection?
Does Witopia not need a username and password?
Posted by Mat At 11:55:26 AM On 10/15/2011 | - Website - |
Posted by Carl Tyler At 12:02:42 PM On 10/15/2011 | - Website - |
Posted by Ben At 06:05:32 AM On 12/10/2011 | - Website - |
Posted by Ben At 07:38:18 AM On 12/10/2011 | - Website - |
thank you, thank you, thank you.
i have spent countless hours trying to find a solution to do this and yours is the easiest, most comprehensive and clear explanation available.
i just flashed a cisco linksys e4200, set the commands and works perfectly. i can now watch netflix and listen to pandora outside the us!
THANK YOU!
Posted by pablo At 01:09:16 PM On 12/11/2011 | - Website - |
Is not working for me.
osx10.7
1st router 192.168.2.1 belkin dhcp.
2cond 192.168.1.1 e4200 ddwrt. \wan ip 192.168.2.2\
Local IP Address : 192.168.1.1
route add -net 192.168.1.1/24 dev br0
no wireless used, all cabled.
uk ip not working, just the same /my/local ip.
can you help pls.
Posted by zutalor At 09:38:44 PM On 12/18/2011 | - Website - |
ASUS RT-N16 (loaded with DD-WRT v24-sp2 (12/20/11) mega - build 18024)
I am currently in China. So, I typically use a specific IP gateway to connect to US.
Quick questions about the script above.
1) Are the only changes need to made in red? When I compare the script that Witopia has under OpenVPN GUI. Yours has a few extra lines, and mssfix 1450 instead 1300 (some IP locations uses 1300 in OpenVPN GUI). I thought to ask.
2) The "Key" and "Cert" files who open with notepad, and use the cut & paste feature to move to the router's screen, it leaves space and empty lines. Does this affect the key & cert validation process? Do I need to manually remove them (space and empty lines)?
3) Do I need to change the client.key and client.crt to the ones with myaccountname.key and myaccountname.crt?
Below is a script from Witopia's OpenVPN GUI for your consideration:
=======================================
##############################################
# Configuration file for use with #
# WiTopia.Net's personalVPN service #
# #
# Please do not modify this file unless #
# instructed to by WiTopia.Net support staff #
##############################################
# Template file for this config modified: Fri Jul 01 10:58:24 +0000 2011
client
dev tun
proto udp
remote specificIPfromWitopia 1194
resolv-retry infinite
nobind
persist-key
persist-tun
ns-cert-type server
cipher bf-cbc
comp-lzo
verb 3
mute 20
ca ca.crt
mssfix 1450
key myaccountname.key
cert myaccountname.crt
show-net-up
#
# Uncomment only if instructed to do so by WiTopia Support Staff
#route-method exe
#route-delay 2
======================================
Thank you!
Mike
Posted by Mike At 07:30:54 PM On 05/23/2012 | - Website - |
Posted by Andrew At 03:58:38 PM On 01/09/2013 | - Website - |
Stopped working after 2 weeks!
Don't know if its the router, isp, vpn provider, dns or internet...
Posted by Andrew At 02:42:12 PM On 02/02/2013 | - Website - |
Posted by Jeff At 04:17:29 AM On 05/26/2013 | - Website - |
Posted by Blair At 06:28:06 AM On 08/25/2013 | - Website - |
I would like to really thank you so much for all the above instructions, it worked for me..... and I have been trying for almost 2 years, given up on it but finally it worked an am so glad that my browser brought your blog to me.... thank you again...
Posted by Mohamed Aly At 08:29:34 PM On 11/29/2013 | - Website - |
Posted by mohamd At 10:29:36 AM On 03/12/2014 | - Website - |
Posted by Carl Tyler At 10:31:22 AM On 03/12/2014 | - Website - |
Posted by mohamd At 01:25:18 PM On 03/12/2014 | - Website - |
Posted by mohamd At 01:27:29 PM On 03/12/2014 | - Website - |
Posted by Carl Tyler At 01:28:05 PM On 03/12/2014 | - Website - |
Posted by mohamd At 02:16:01 PM On 03/12/2014 | - Website - |
once again the settings for the witopia VPN router aren't working..:) it was all good until a week ago... I renewed the certificates from witopia again and added in the router commands but for some reason my IP address doesn't change!
I read your recent post about unblock-us but it wont work here in the UAE as they block the service..:(
my subscription to witopia will end in 20 days all modes of connection are working alright (IPsec pptp l2tp and open vpn) but not on the router..recently I installed windows 8.1...
is there something that am missing or doing wrong? or do you have any suggestions for me for any other services?
I cant use my apple Tv since the VPN stopped....
Thank you again for your Posts they are really helpful...
regards
Mohamed
Posted by Mohamed At 12:40:24 PM On 07/03/2014 | - Website - |
Posted by Mohamed At 12:49:18 PM On 07/03/2014 | - Website - |
I think I'll have to part with witopia after all ... been with them for over 6 years...
Posted by Mohamed At 08:47:51 AM On 07/04/2014 | - Website - |
Posted by Mohamed At 08:50:12 AM On 07/04/2014 | - Website - |
Also confused because my ca.crt seems to have two certificates. It's got
--start--
contents
--end--
--start--
different contents
--end--
Anyone have any suggestions?
Posted by RS At 01:39:30 PM On 09/23/2014 | - Website - |